Customer Setup SharePoint
This guide explains what you, as the customer, need to provide to enable the integration between your SharePoint and our platform.
1. Prerequisites
Before proceeding, ensure you have the following:
- Admin access to your SharePoint instance.
- Access to your organization's Azure portal to retrieve the Tenant ID.
2. Retrieve SharePoint Base URL
Steps to Find the Base URL
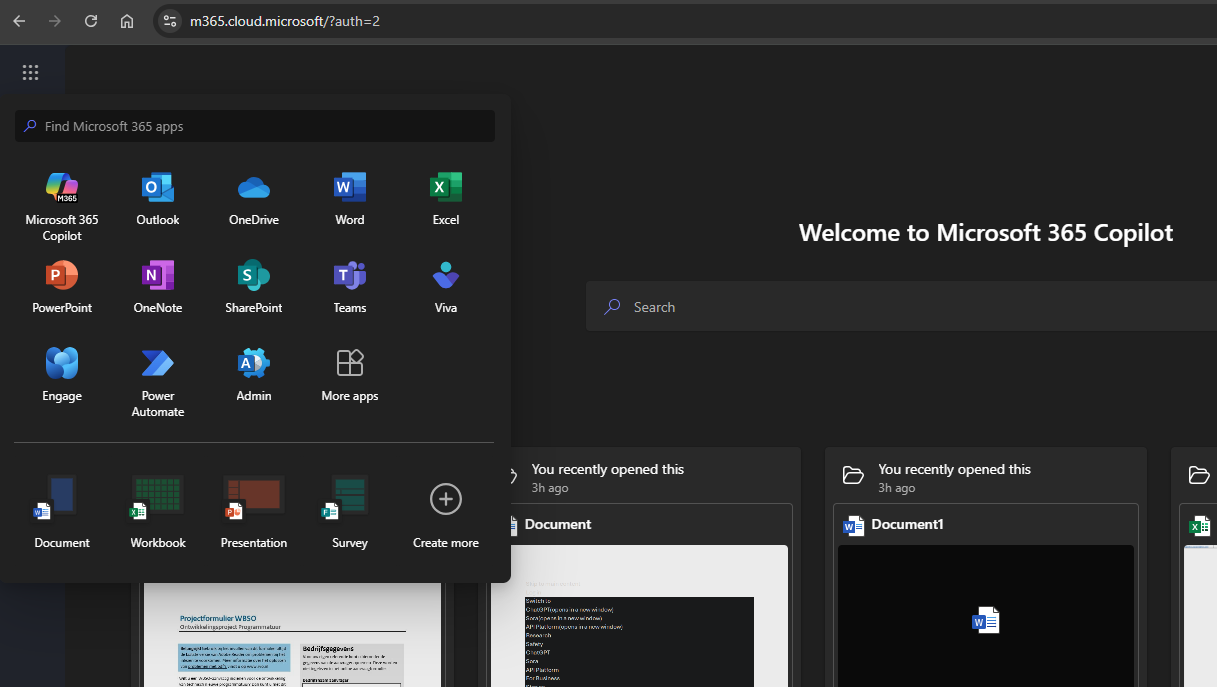
- Log in to your organization's Office 365 suite.
- From the nine-tile menu, open the SharePoint App.
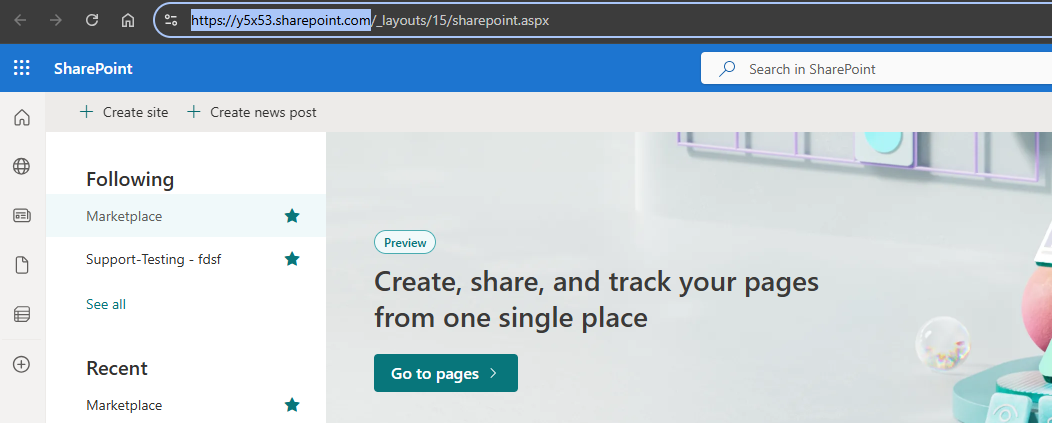
- Copy the Base URL of your SharePoint instance.
- Example: https://yourdomain.sharepoint.com.
3. Retrieve Microsoft Tenant ID
Steps to Find the Tenant ID
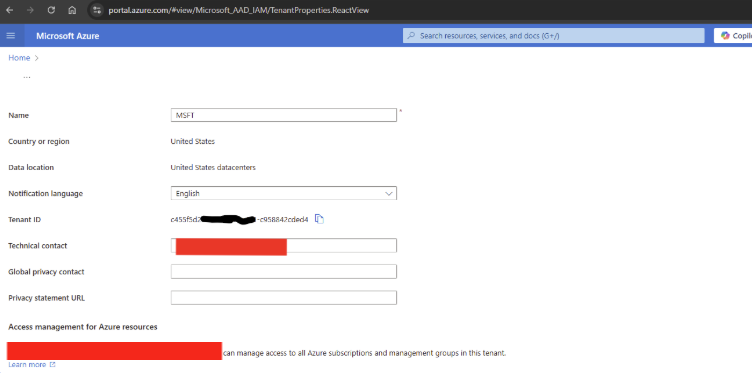
- Log in to your organization's Azure portal at Azure Portal.
- Search for Tenant Properties in the search bar.
- Copy the Tenant ID from the Tenant Properties page.
4. Choose Access Mode
Our SharePoint integration supports two access modes. Choose the one that best fits your organization's security requirements:
| Mode | Permission | Description | Best For |
|---|---|---|---|
| Sites.ReadAll (Default) | Broad access | Allows the integration to search and access all SharePoint sites in your tenant. | Organizations that want full access across all sites without additional configuration. |
| ListItems.SelectedOperations.Selected(Selected Folder) | Restricted access of Folder Level | Allows the integration to access only specific SharePoint Folders or Files that you explicitly grant permission to. | Organizations with strict security policies or compliance requirements. |
Sites.ReadAll (Default)
- No additional setup required after admin consent.
- The integration can search and retrieve content from any site in your tenant.
How to use this mode:
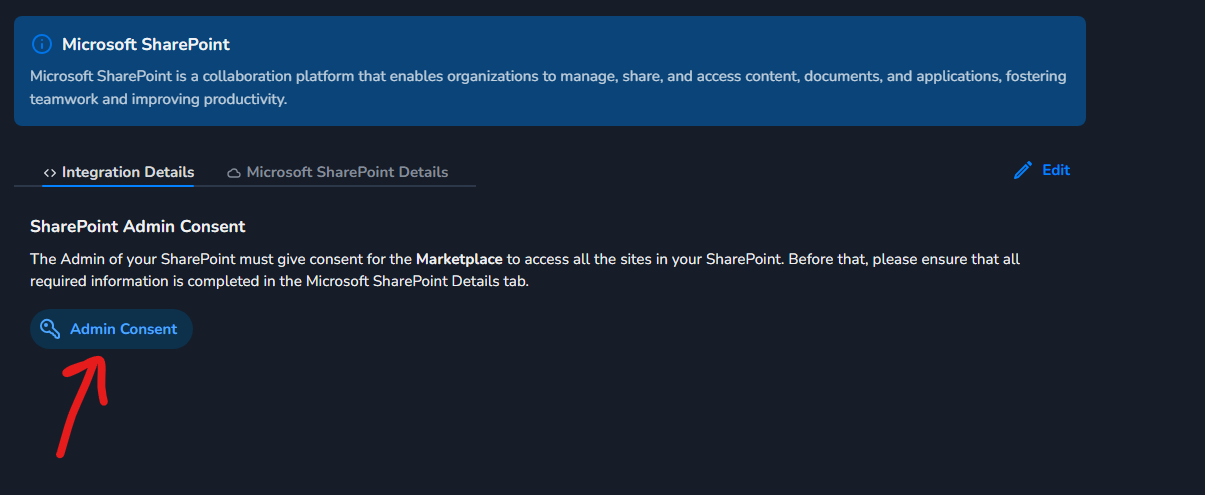
- Leave the Selected Folder checkbox unchecked in the UI.
- Proceed with admin consent.
- You will see a consent screen to grant permissions to our application.
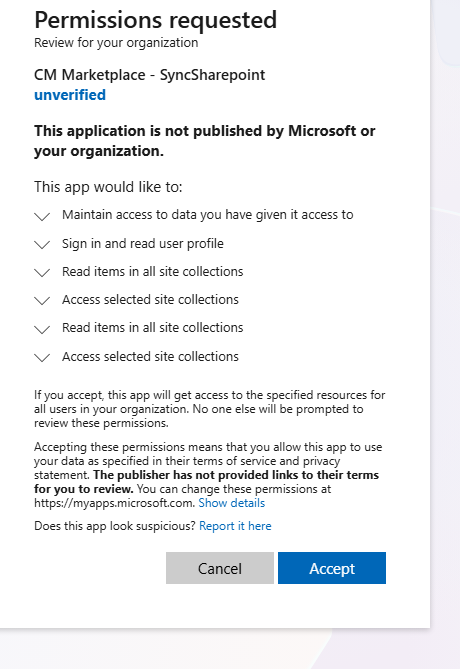
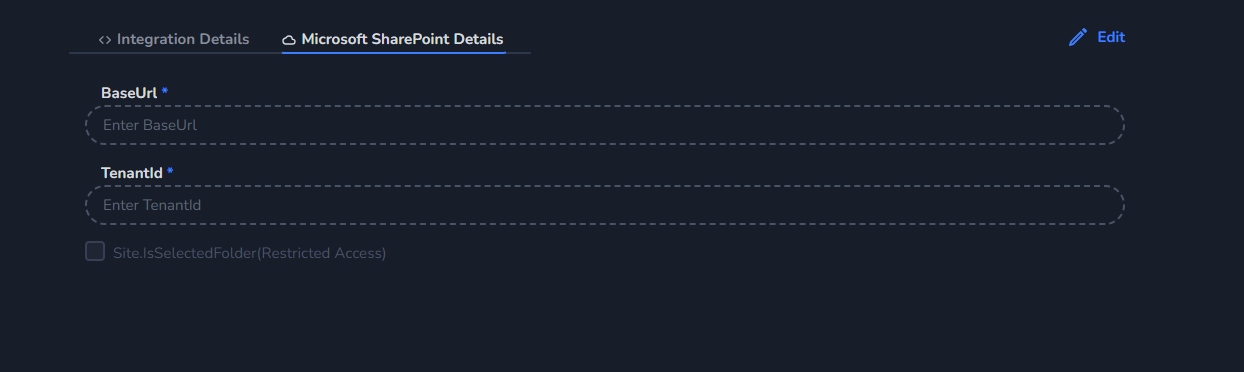
Selected Folder (Restricted Access)
If you want restricted access at the folder level, select Selected Folder by checking the checkbox in the UI before proceeding with admin consent.
Important: If you select this option, you will see a different consent screen for folder-level permissions, and you must complete the additional steps below after admin consent.
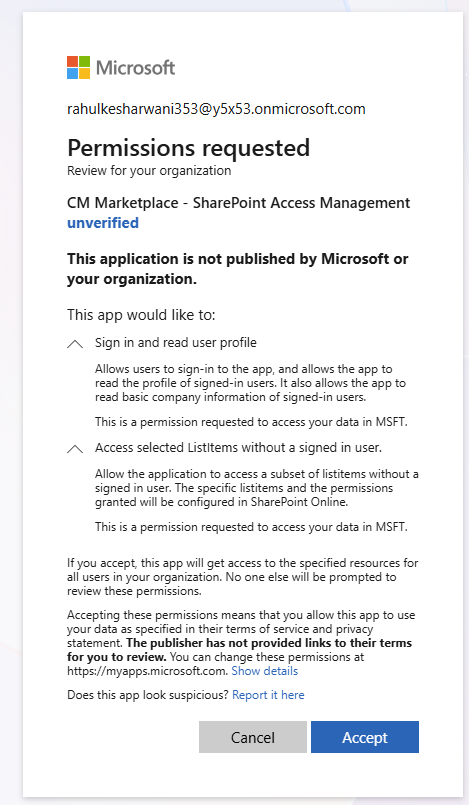
After that, additional steps are required following admin consent.
Step 1: Sign in to Graph Explorer
- Navigate to Microsoft Graph Explorer.
- Click on your profile icon at the top of the page.
- Sign in with your SharePoint Administrator account.

Step 2: Grant Yourself Full Control Permission
To grant site access to our application, you first need to give yourself the necessary permissions:
-
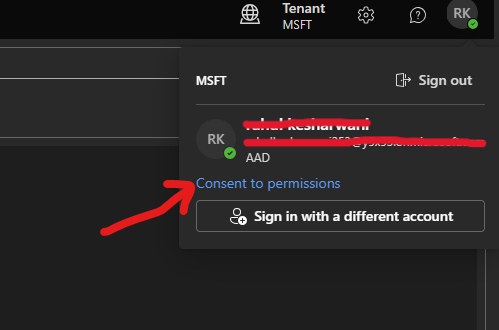
Click on your profile icon and select Consent to permissions.
-
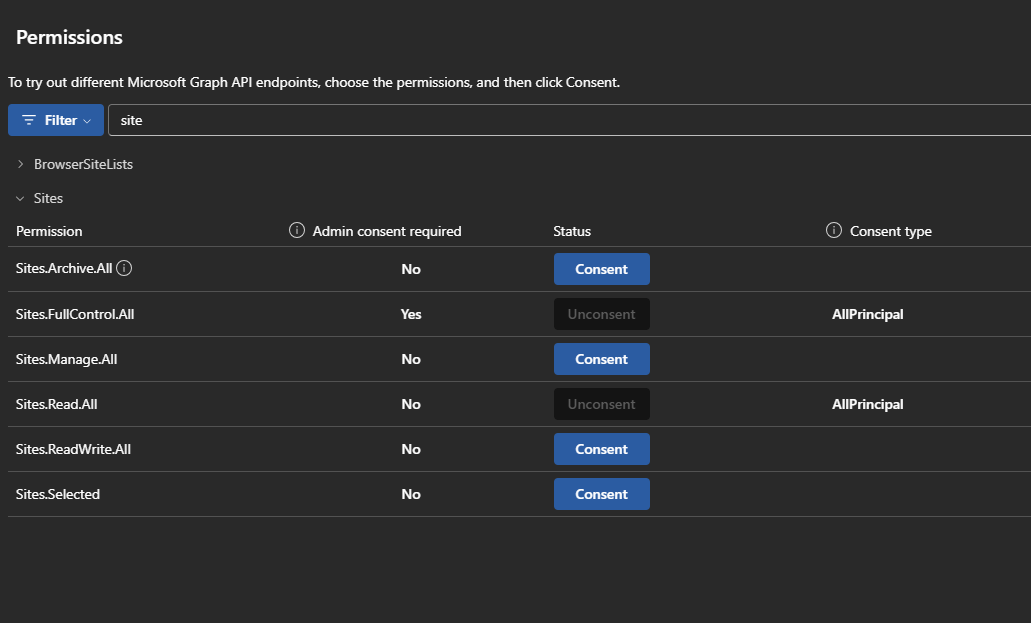
In the Permissions tab, search for Sites.
-
Select Sites.FullControl.All and provide consent.
Note: This permission is only for yourself to enable you to grant access to our application in the next steps.
Step 3: Retrieve the Site ID
You need to obtain the Site ID for each SharePoint site you want to grant access to.
-
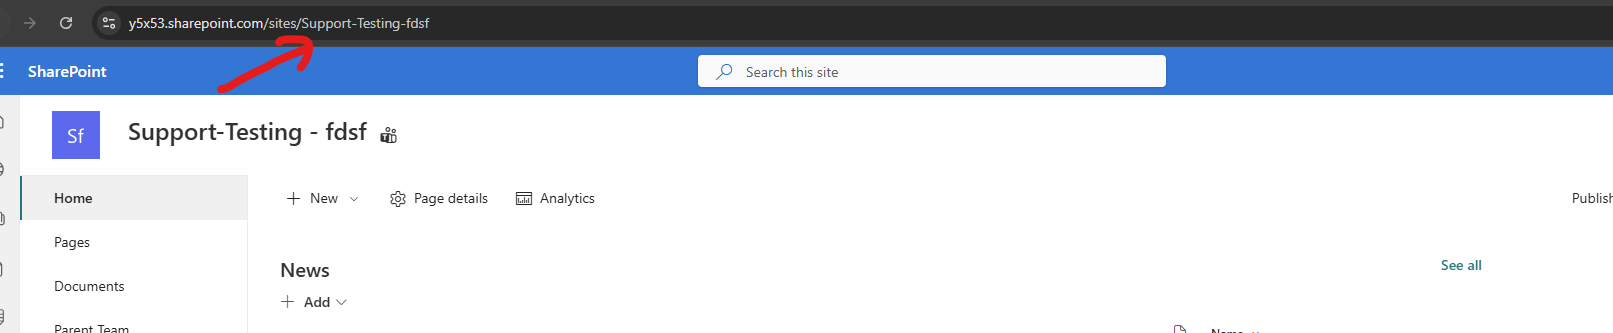
In Graph Explorer, identify the site you want to grant permission to and note its Site Name.
Example: If your site URL is
<https://y5x53.sharepoint.com/sites/Support-Testing-fdsf,> the site name isSupport-Testing-fdsf.
- In Graph Explorer, enter the following GET request in the URL field:
https://graph.microsoft.com/v1.0/sites/{hostName}:/sites/{SiteName}
Example:
https://graph.microsoft.com/v1.0/sites/y5x53.sharepoint.com:/sites/Support-Testing-fdsf
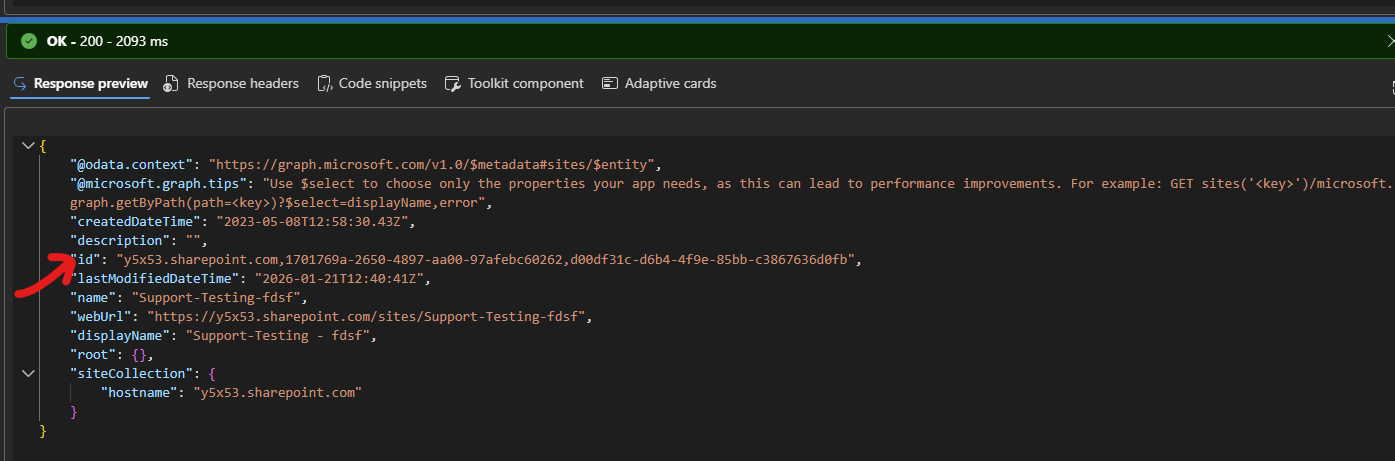
- Click Run query.
- From the response, copy the id field value. You will need this Site ID for the next step.
Step 4: Retrieve the Drive ID
Step 4: Retrieve the Drive ID
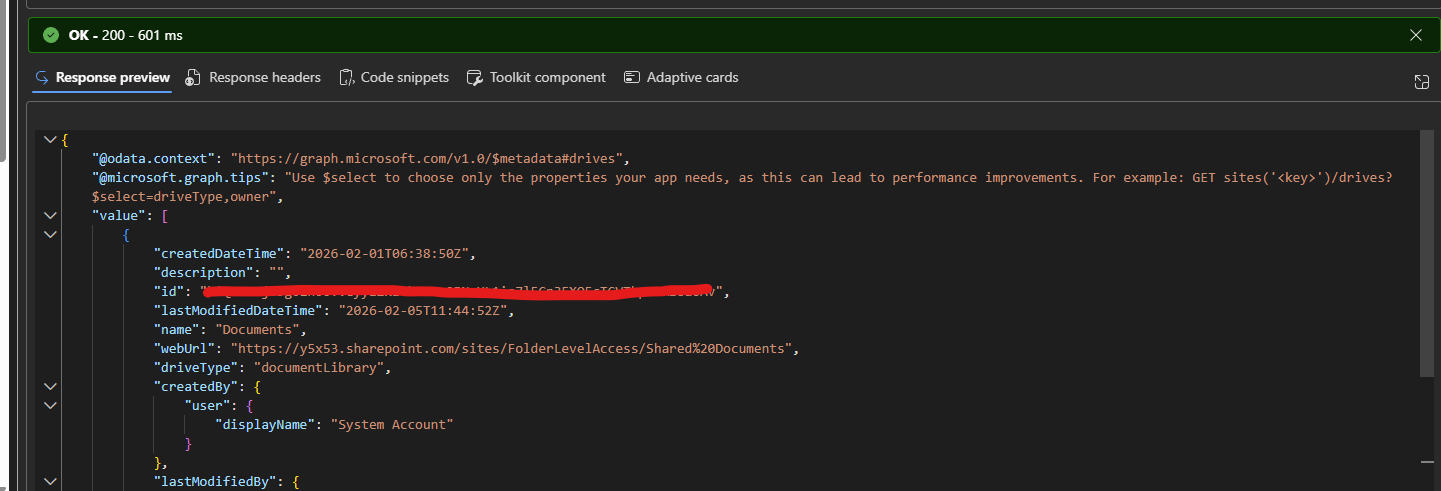
- In Graph Explorer, enter the following GET request:
https://graph.microsoft.com/v1.0/sites/{site-id}/drives
- Click Run query.
- From the response, copy the
idfield from the first drive in thevaluearray.
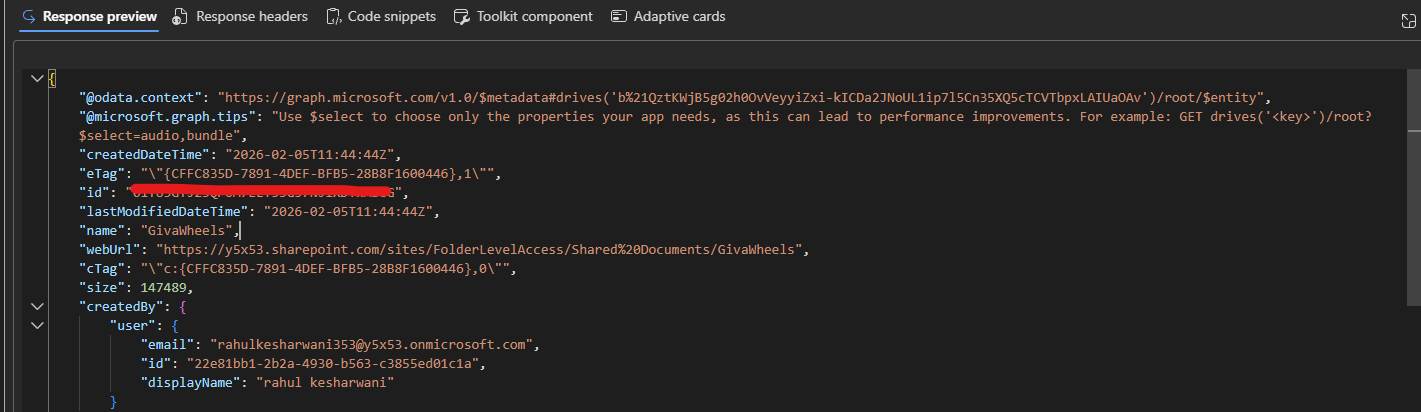
Step 5: Retrieve the Folder ID
Get the folder ID for the specific folder you want to grant access to:
- In Graph Explorer, enter the following GET request:
https://graph.microsoft.com/v1.0/drives/{drive-id}/root:/{folder-path}
https://graph.microsoft.com/v1.0/drives/b!abc123/root:/MaxCorp
- Click Run query.
- From the response, copy the
idfield value. This is the Folder ID.
Step 6: Receive Application Client ID
The delivery team will provide you with the Application (Client) ID of our Azure AD application.
Step 7: Grant Folder Access to the Application
You must grant our application access to each specific folder using Microsoft Graph Explorer:
- In Graph Explorer, change the request method to POST.
- Enter the following URL:
https://graph.microsoft.com/v1.0/drives/{drive-id}/items/{folder-id}/permissions
- In the Request body section, paste the following JSON:
{
  "roles": ["read"],
  "grantedToV2": {
    "application": {
      "id": "<Application-Client-ID>",
      "displayName": "CM Marketplace SharePoint Integration"
    }
  }
}
- Make the following replacements:
- Replace
{drive-id}with the Drive ID you retrieved in Step 4 - Replace
{folder-id}with the Folder ID you retrieved in Step 5 - Replace
<Application-Client-ID>with the Client ID provided by the delivery team
- Replace
- Click Run query to execute the request.
- Repeat Steps 3-7 for each folder you want the integration to access.
Example: Granting Access to Multiple Folders
If you want to grant access to folders in multiple sites:
| Site | Folder | Access |
|---|---|---|
| Max Corp | Personnel info | NO ACCESS |
| Max Corp | Financial info | NO ACCESS |
| Max Corp | HALO Knowledge base | ACCESS |
| Max Works | Other folders | NO ACCESS |
| Max Works | HALO Center | ACCESS |
For the above scenario, you would:
- Grant folder permission for "HALO Knowledge base" in Max Corp site
- Grant folder permission for "HALO Center" in Max Works site
Below is the video for Reference:
Share Details with the Delivery Team
Once you have completed the setup, share the following details with the delivery team:
| Information | Required | Description |
|---|---|---|
| Base URL | Yes | Your SharePoint base URL (e.g., https://yourdomain.sharepoint.com) |
| Tenant ID | Yes | Your Azure AD Tenant ID |
| Access Mode | Yes | Choose: Sites.ReadAll (default) or Selected Folder (restricted) |