Customer Setup Facebook Ads
Overview
The Facebook Ads integration allows you to sync your AddressBook contact groups to Facebook Custom Audiences. This enables you to target your existing contacts with ads on Facebook.
Prerequisites
Before setting up the integration, ensure you have the following:
- Facebook Business Portfolio (Business Manager) — You must have an active Business Portfolio. If you don't have one, create it at business.facebook.com.
- Facebook Ad Account — An Ad Account linked to your Business Portfolio. Note down the Ad Account ID (numeric, found in Business Manager under Ad Accounts).
- Admin Access — The user authorizing the connection must have admin/full control permissions on the Business Portfolio.
- Custom Audience Terms of Service Accepted — Before the integration can create Custom Audiences, you must accept Facebook's Custom Audience Terms.
- Visit:
<https://business.facebook.com/ads/manage/customaudiences/tos/?act=<YOUR_AD_ACCOUNT_ID>> - This is a one-time requirement per ad account.
- Visit:
- Audience Source — Contacts can be synced from either of the following (pick one per adapter):
- AddressBook Groups — contact groups already created in AddressBook, or
- CXP Segments — segments built in CM's CDP/CXP platform. If you plan to use this source, you'll also need your CXP Tenant ID — contact the CM CDP/CXP team if you don't already have this, so it can be configured on your adapter.
Setup Steps
Step 1: Start Authorization
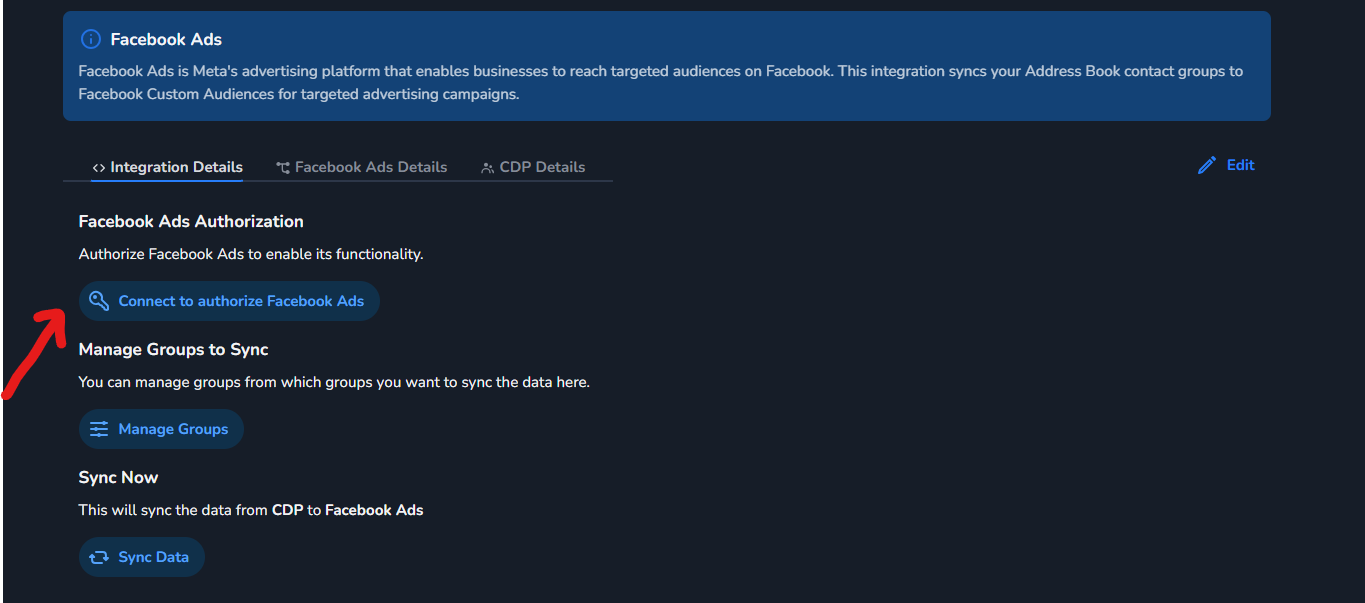
- Navigate to the CDP Marketplace and select the Facebook Ads adapter.
- Click **Connect to authorize Facebook Ads **to start the connection process.
Step 2: Select Your Business Portfolio
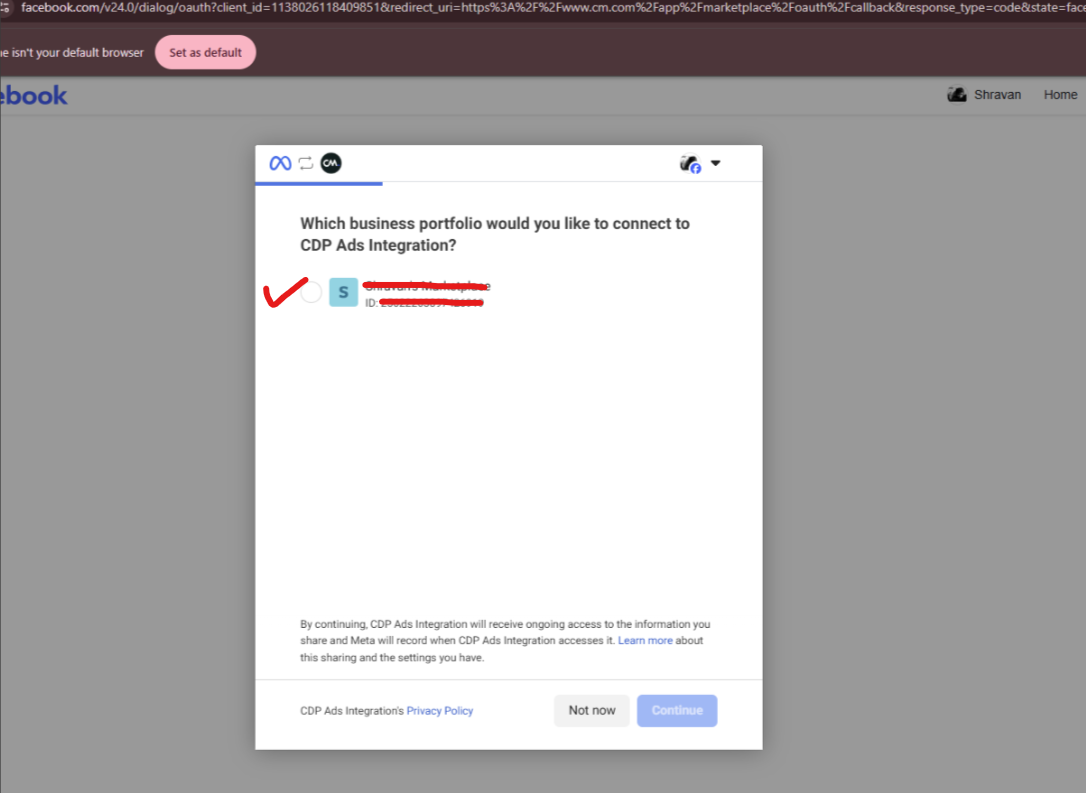
- Facebook will ask: "Which business portfolio would you like to connect to CDP Ads Integration?"
- Select your Business Portfolio from the list.
- Click Continue.
Step 3: Grant Ad Account Access
- Facebook will ask you to choose which Ad Accounts the integration can access.
- Select the ad account(s) you want to use for Custom Audiences.
- Click Continue.
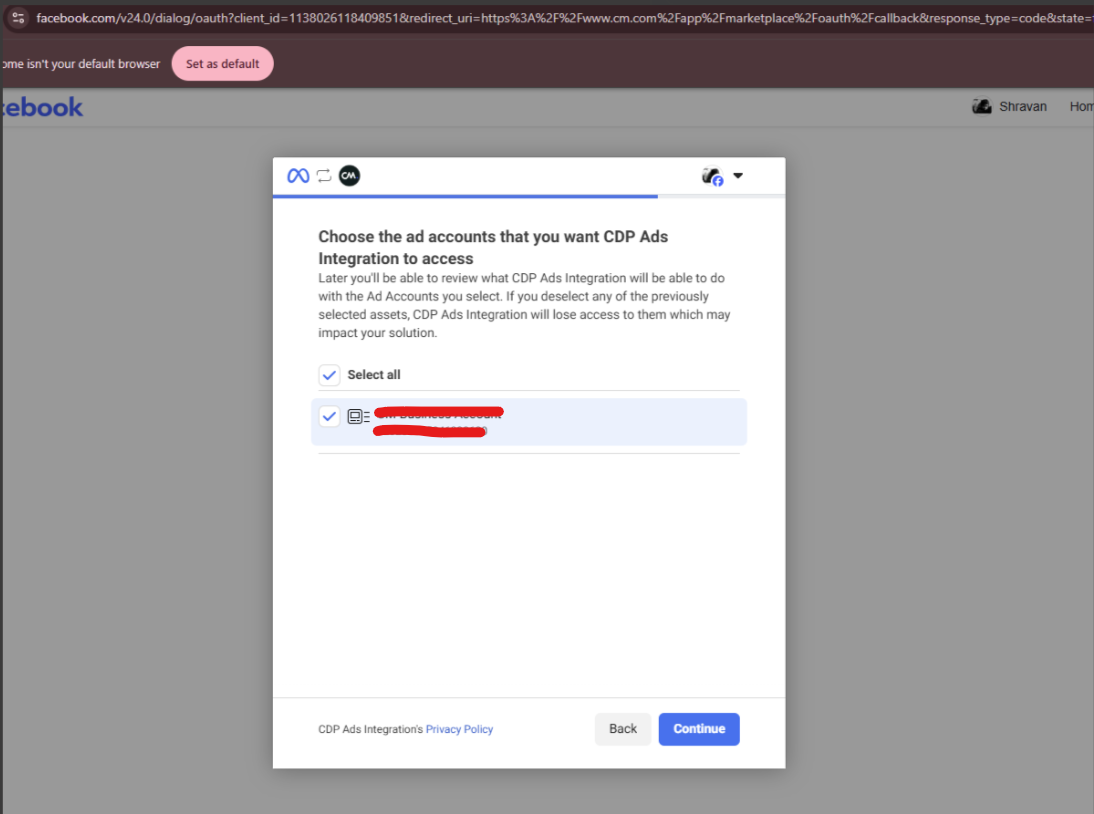
NOTE: Please select only the Ads account that you have provided to the delivery team. Do not choose any other account.
Step 4: Review and Confirm Permissions
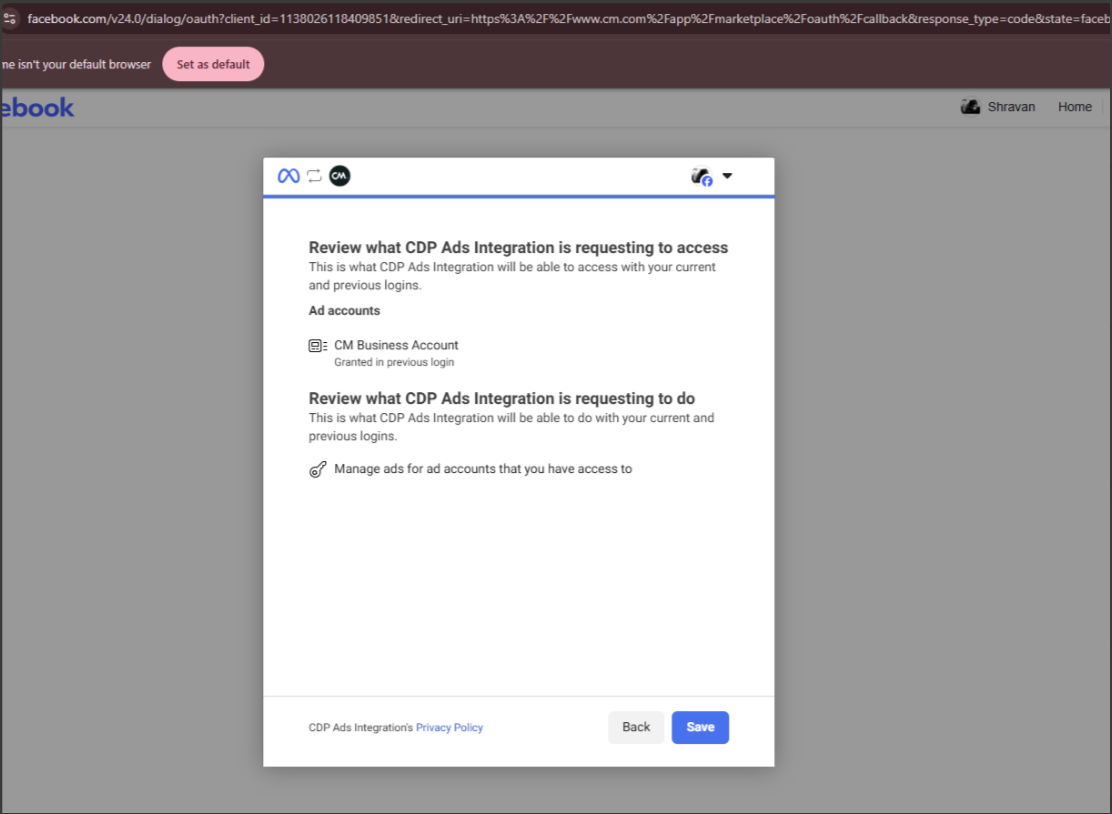
- Review the requested permissions (Ad accounts and
ads_managementpermission). - Click Save to confirm.
Step 5: Connection Complete
- You will see a confirmation: "[Your Business] has been connected to CDP Ads Integration".
- Click Got it — you will be redirected back to the Marketplace.
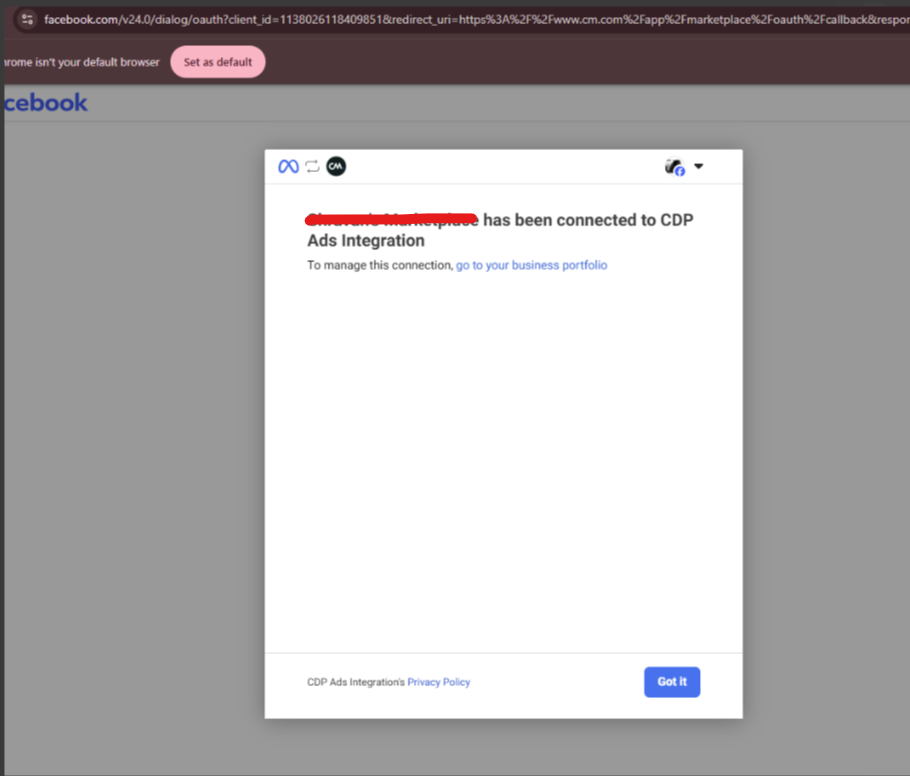
- The integration will generate a System User Access Token that does not expire. You do not need to re-authorize unless you revoke access.
Step 6: Configure the Adapter
After authorization, provide the following configuration:
| Field | Description | Example |
|---|---|---|
| Ad Account ID (Required) | Your Facebook Ad Account ID (numeric) | 123456789 |
| Sync Schedule (Required) | Cron expression for automatic sync | You can inform the delivery team about when you would like to sync the data, specifying the schedule for example, daily at a specific time, on Sundays, or on the 1st of every month. |
| AddressBook Groups | Select the contact groups to sync | Select from the dropdown |
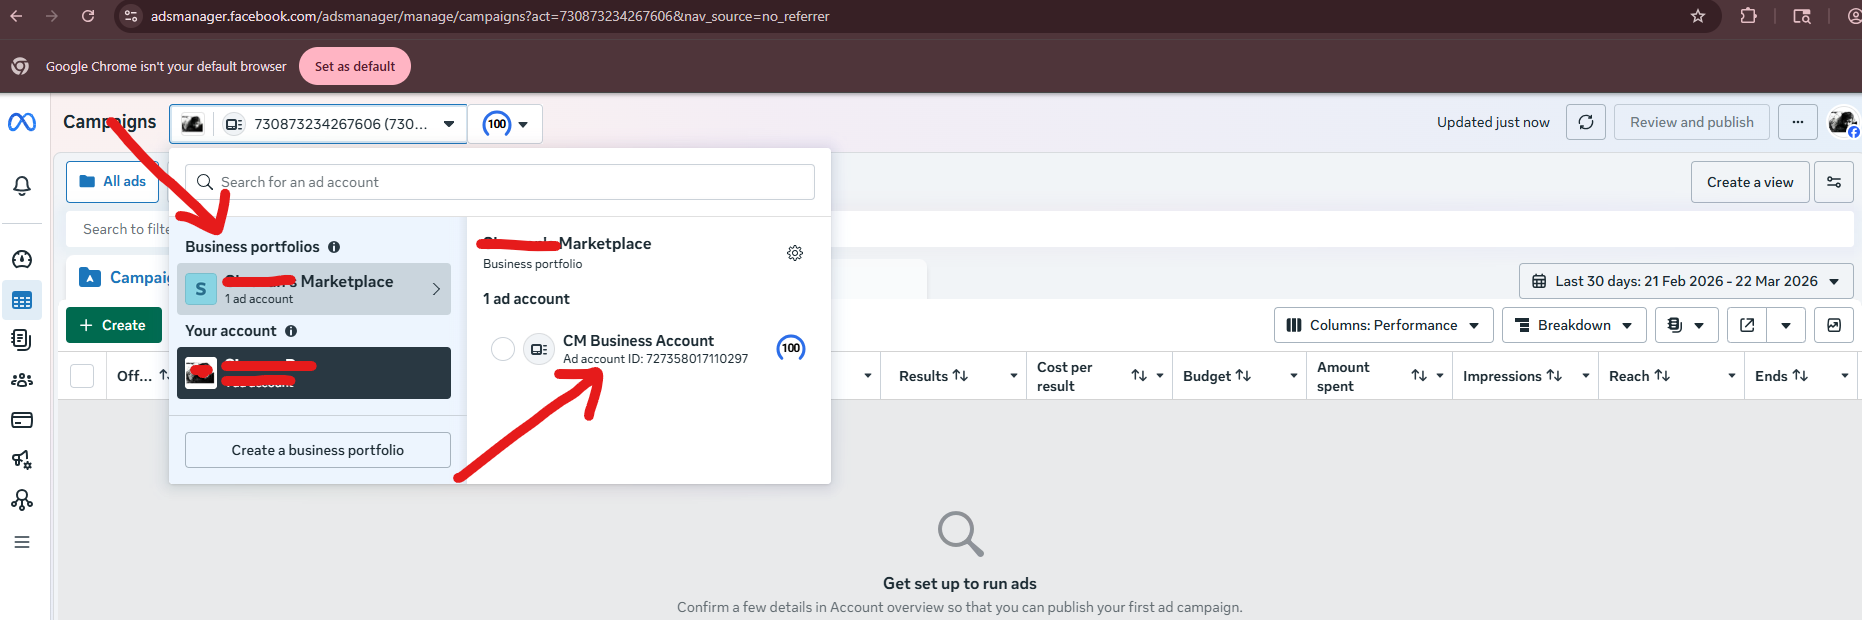
Facebook Ad Account: An Ad Account linked to the Business Portfolio you intend to authorize. To find your Ad Account ID:
- Go to Facebook Ads Manager
- Click the Account dropdown in the top-left corner
- Your Ad Account ID is the numeric value displayed below the account name (e.g.,
123456789) - Ensure this ad account is linked to the Business Portfolio you will grant access to during authorization
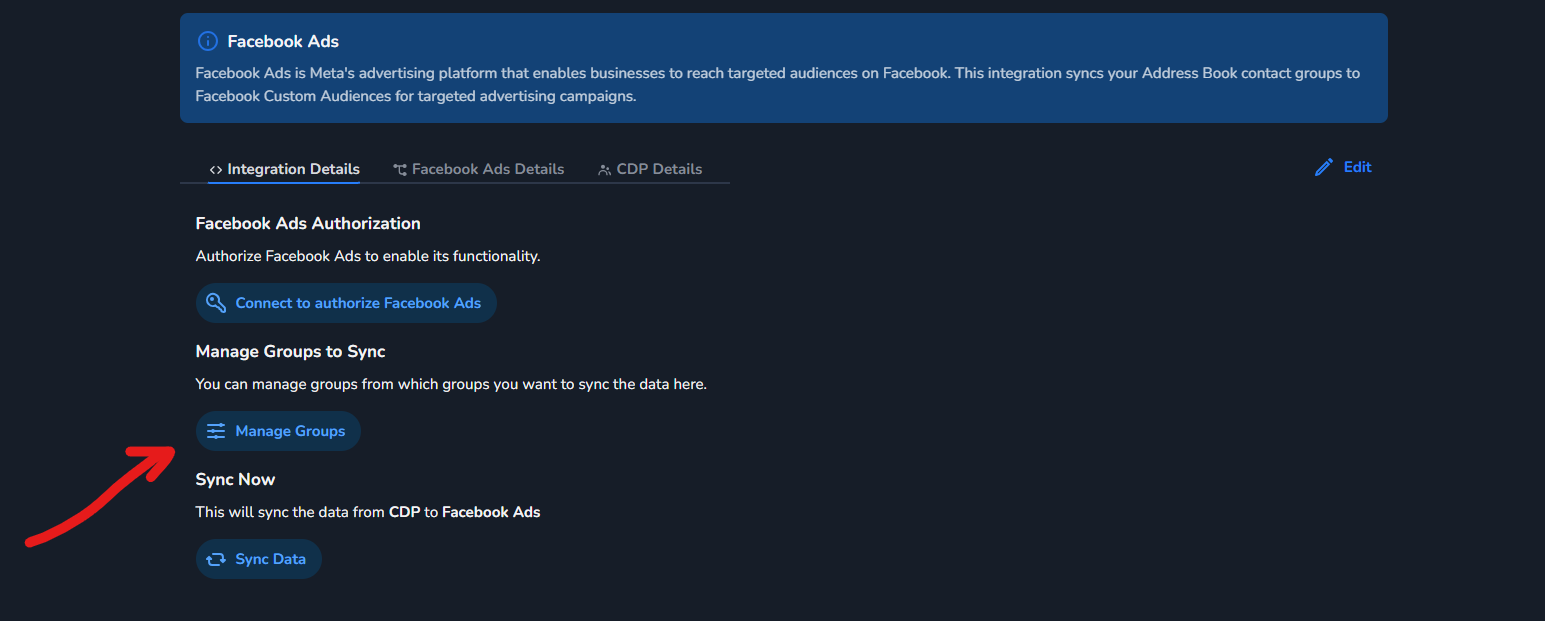
Manage Groups to Sync
You can click on the Manage Groups button, which will redirect you to a page where you can select the groups you want to sync with Facebook Ads.
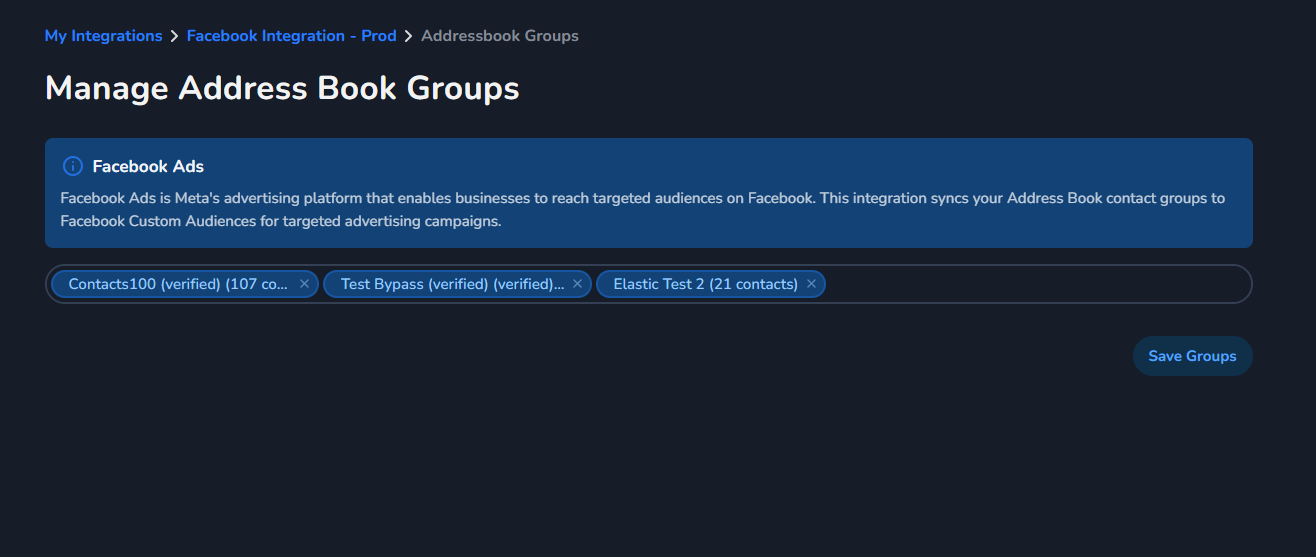
You can select multiple groups that you want to sync and can click on save groups button
Audience Source: AddressBook or CXP Segments
Under adapter configuration, choose which source to sync from:
- AddressBook — click Manage Groups, select the contact group(s) you want to sync, and click Save groups. You can select multiple groups.
- CXP Segments — click Manage Segments, select the segment(s) you want to sync from your CXP tenant. If a segment has more than one email-type property (e.g. "Personal Email" vs "Work Email"), you'll be asked to pick which one to use — if it only has one, this is selected automatically.
Only one source is active per adapter at a time. Selecting CXP Segments does not remove your AddressBook configuration — you can switch back at any time.
Step 7: Sync
Once configured, the integration will:
- Automatically sync contacts based on the configured schedule.
- You can also trigger a **Sync Data **manually from the adapter settings.
How the Sync Works
- Initialization — The system prepares the sync session.
- Audience Setup — For each selected AddressBook group:
- Checks if a Custom Audience with the same name already exists in your Ad Account.
- If it exists, reuses the existing Custom Audience.
- If not, creates a new Custom Audience with the same name as your AddressBook group.
- Contact Sync — For each group or segment:
- Retrieves contacts from the AddressBook group, or members from the CXP segment (using the selected email property).
- Filters out contacts without a valid email address. AddressBook contacts marked as unsubscribed are also excluded CXP Segments don't carry an unsubscribe flag today, so build any suppression logic into the segment definition itself in CXP.
- Hashes email addresses using SHA-256 raw emails are never shared with Facebook.
- Uploads hashed emails to the corresponding Custom Audience in batches of 1,000.
Important Notes
- Token Validity — The integration uses a System User Access Token that never expires. You do not need to re-authorize periodically.
- Data Privacy — Email addresses are hashed (SHA-256) before being sent to Facebook. Facebook matches these hashes against their own user database — plain-text emails are never shared.
- Match Rate — Facebook matches uploaded hashed emails against its user base. Not all contacts will match, which is expected behavior. Match rates vary depending on how many of your contacts have Facebook accounts with the same email.
- Unsubscribed Contacts — Contacts marked as unsubscribed in your AddressBook are automatically excluded from the sync.
- Custom Audience Naming — Custom Audiences are created with the same name as your AddressBook groups.
- Re-authorization — If you need to change which ad accounts the integration can access, simply go through the authorization flow again.
Troubleshooting
| Issue | Solution |
|---|---|
| "Custom Audience Terms not accepted" | Accept the terms at <https://business.facebook.com/ads/manage/customaudiences/tos/?act=<AD_ACCOUNT_ID>> |
| "App isn't available" during authorization | Ensure you are logging in with an account that has admin access to the Business Portfolio. If the issue persists, contact support. |
| Sync fails with "Access token not found" | Re-authorize by disconnecting and reconnecting the adapter. |
| Sync fails with "Unauthorized" | Your token may have been revoked from Facebook Business Manager. Re-authorize the connection. |
| "Ad account owner has NOT granted ads_management permission" | Re-authorize the integration and ensure you grant access to the correct ad account. |
| Sync completes but no contacts appear | Verify that your AddressBook group has contacts with valid email addresses that are not unsubscribed. |
| Low match rate on Facebook | This is normal — Facebook can only match emails that are registered on their platform. |
| Custom audience not appearing in Ads Manager | It can take up to 24 hours for a new audience to become available for targeting. |
| Segment picker shows no segments / sync finds 0 members | Your adapter's CXP Tenant ID isn't set or doesn't match the CXP tenant your segments live in. Contact the CM delivery team to verify/correct the CXP Tenant ID configured on your adapter. |